X3 control panel
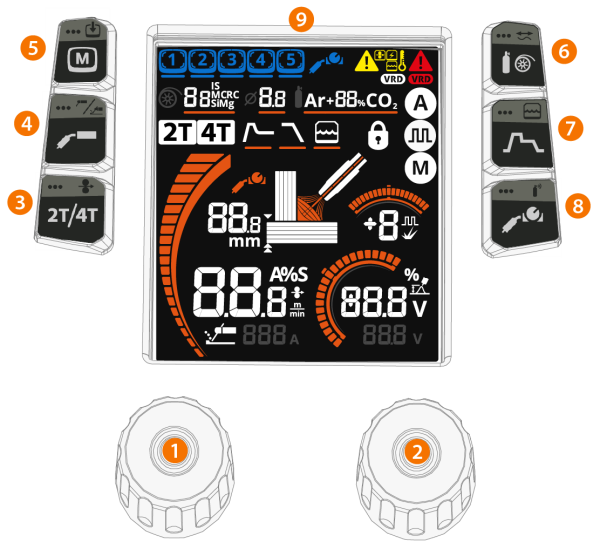
This section introduces the controls and features of the X3 wire feeder's control panel.
|
1.
|
Left control knob (more information below) |
>> Turn and press the control knob to make selections
|
2.
|
Right control knob (more information below) |
>> Turn and press the control knob to make selections
|
3.
|
Trigger logic and wire inch button |
>> Short press: Trigger logic selection (2T/4T)
>> Long press: Wire inch, drive the filler wire forward (with arc off)

|
During wire inch, the wire feed speed can be adjusted with the right control knob. |
|
4.
|
Process and mode button |
>> Short press: MIG welding process selection (Manual MIG (M) / 1-MIG (A) / Pulse MIG ( )). Use the right control knob to make the selection. When in Manual MIG mode, the short press of the button opens the material selection menu first.
>> Long press: Operation mode selection (MIG/MMA/Gouging)
|
|
The Pulse MIG process is available only with a pulse power source. |
|
|
When in MMA or Gouging mode, short press of the welding process selection always returns the device to the MIG mode. |
>> Short press: Change memory channel
>> Long press: Save to memory channel >> For more information, refer to: Memory channels
|
6.
|
Material selection and cable calibration button |
>> Short press: Filler wire material, thickness and shielding gas selection >> For more information, refer to: Base settings for 1-MIG and Pulse MIG
>> Long press: Cable calibration >> For more information, refer to: Calibrating welding cable
|
7.
|
Welding parameters button |
>> Short press: Additional welding parameter adjustments: Hot start / Crater fill / Post current (PC) >> For more information, refer to: Additional welding parameters
>> Long press: Water cooling AUT/ON/OFF (AUT = Automatic). Use the right control knob to make the selection.
|
8.
|
Remote control and gas test button |
>> Short press: Remote control mode selection (applies to torch remote control only): Wire feed speed / Channel / OFF
>> Long press: Gas test, test the shielding gas flow and flush the gas line
|
|
During gas test, the gas flow can be adjusted with control knob. |
|
9.
|
Control panel display. |
>> For more information, refer to: X3 control panel.
Control knob functions in main welding view
Left control knob:
|
•
|
Manual MIG: Wire feed speed adjustment |
|
•
|
1-MIG: Wire feed speed adjustment |
|
•
|
Pulse MIG: Wire feed speed adjustment |
|
•
|
MMA: Welding current adjustment |
|
•
|
Gouging: Current adjustment. |
Right control knob:
|
•
|
Manual MIG: Welding voltage adjustment |
|
•
|
1-MIG: Fine tuning of welding voltage / Dynamics (press to switch between adjusted parameters) |
|
•
|
Pulse MIG: Fine tuning / Pulse current (press to switch between adjusted parameters) |
|
•
|
MMA: Dynamics adjustment. |
|
|
The right control knob is the default control knob for adjustments and selections when saving welding parameters to a memory channel or when adjusting additional parameters. |
|
|
In most of the adjustment and setup views, pressing the left control knob or one of the side buttons returns back to the main view. |
>> For more information, refer to: Main welding parameters
Safety lock: By long-pressing the control knobs 1 and 2 simultaneously for 2 seconds, the device can be locked for safety. This prevents welding and operating the device by accident without having to turn the equipment off. Unlock the device by pressing the control knobs 1 and 2 simultaneously for 2 seconds.
Factory reset: By long-pressing the function buttons 3 and 8 (trigger logic and remote control buttons) simultaneously for 5 seconds, the device can be reset to factory settings.
|
|
Resetting to factory settings will erase all user data. |