Calibrating welding cable
With X3 FastMig, the welding cable resistance can be measured using the built-in cable calibration function without additional measurement cable. This calibration function is available only in MIG operation mode.

|
Calibration needs to be done when the machine has never been welded before, or the total length of the welding torch, interconnection cable and earth return cable has changed by at least 5 meters. |
| 1. | Connect the earth return cable between the power source and work piece. |
| 2. | Remove the MIG welding torch gas nozzle. |
| 3. | Connect the MIG welding torch to the wire feeder. |
| 4. | Turn the welding equipment on. |
| 5. | On the control panel, press the cable calibration button (long press of the filler wire and shielding gas setup button). |

>> For more information on the X3 wire feeder control panel, refer to X3 control panel.
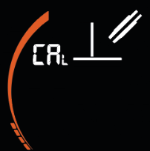
| 6. | Press the control knob button in the control panel to start and touch the cleaned work piece with the MIG welding torch contact tip. |

>> Follow the progress bar on the control panel display.
|
|
There is no need to pull the trigger. Trigger function is disabled at this stage. |
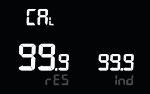
Once finished, the calibration values (resistance and inductance) are shown on the screen.