USB update
The USB update feature allows the firmware to be updated as well as welding programs, processes and features to be installed using a USB memory stick.

|
There can be only one ZIP file on the USB memory stick inserted into the welding system at once. This can be either a dedicated firmware pack for this welding system or a welding program and license pack (matching the power source serial number). For more information on the available software and compatibility, contact your local Kemppi representative. |
|
|
In a double wire feeder setup, the update must be performed on both wire feeders separately. |
Firmware and welding software
| 1. | Ensure you have the correct firmware/software ZIP package saved on your computer for the welding equipment in question. |
| 2. | Connect the USB memory stick to the computer. |
| 3. | Prepare the USB memory stick by copying the firmware/software ZIP file into the root folder of the memory stick. |
| 4. | Turn the welding equipment on. |
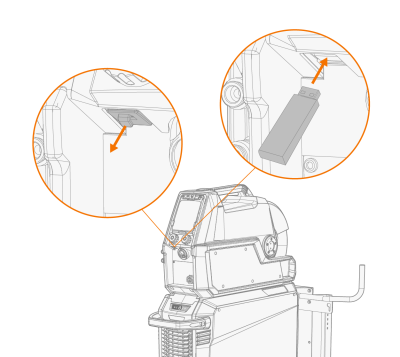
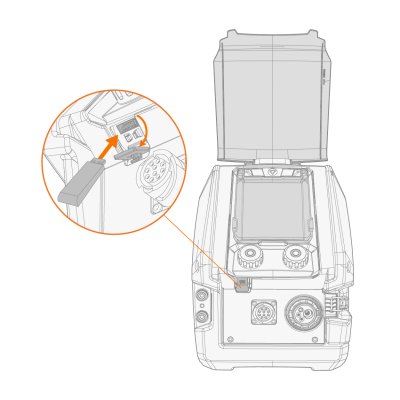
| 5. | Open the USB connector cover and connect the USB memory stick to the X5 wire feeder. |
>> X5 Wire Feeder 300:
>> X5 Wire Feeder HD300:
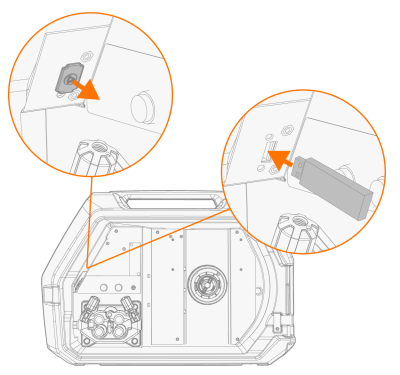
>> X5 Wire Feeder HD200:
| 6. | The update process starts automatically. Follow the on-screen instructions. |
Custom screensaver image
X5 WF AP/APC
This screensaver feature is available with X5 Wire Feeder 300 AP/APC and X5 Wire Feeder HD300 AP/APC.
The custom screensaver image must first be prepared at https://kemp.cc/screensaver and then copied onto the USB memory stick. The supported image file formats are JPG, PNG and GIF.
| 1. | On your computer web browser, go to https://kemp.cc/screensaver. |
| 2. | Following the on-screen instructions, upload, edit and download the new screen saver image onto a USB memory stick. |
| 3. | Connect the USB memory stick to the X5 control panel following the same principle than with the software updates (previous chapter) and the on-screen instructions. |
The screensaver image is shown during start-up and when the control panel has been idle for a predefined time. The screensaver settings can be adjusted in AP/APC control panel: Device settings.