Welding data collection: tracking heat input
You can set the device to track the heat input of each weld and provide the welder with heat input values.
To get the heat input value, select Complete Pass. Identify the weld and perform at least one welding run. After this, the Complete Pass selection appears in Control Pad's Task view.
In heat input calculation the system uses travel speed, welding current, voltage, and welding process information. To calculate the right value for travel speed, enter the length of the weld.
Proceed as follows:
| 1. | Log in to Control Pad. Identify the WPS and the weld. |
>> The device considers all subsequent welding to be part of a pass and takes it into account in heat input calculation.
| 2. | When you have finished welding, select Complete Pass. |

|
You can also weld several runs, select Complete pass after the last run, and enter the total length of the runs. |
|
|
Before you can change to another weld or WPS, Control Pad prompts you to complete the pass to ensure that all data is recorded and documented. This may also happen if you try to select Weld complete, but the pass is not yet completed. |
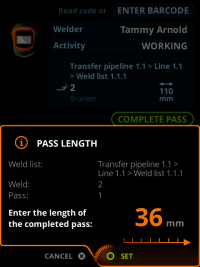
| 3. | Enter the welded length (mm). Use the right control knob to change the pass length. |
|
|
The length may be preset in WeldEye, but you can change it if needed. |
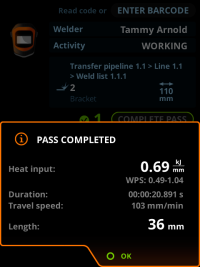
After you mark the pass complete, Control Pad shows the average heat input and travel speed values and indicates whether they are within the WPS limits. You can use this feedback to adjust the parameters or welding technique. The device also sends the data to the WeldEye cloud service for documentation.
Control Pad displays the number of completed passes with a round green checkmark next to it.
Enable heat input tracking in the WeldEye cloud service.