Start and stop functions
Touch Sense Ignition
Touch Sense Ignition delivers minimum spatter and stabilizes the arc immediately after ignition.
To set Touch Sense Ignition ON or OFF with Control Pad, go to Settings > Start and stop logic > Touch Sense Ignition.
Upslope
The UpSlope function gradually increases the welding power / wire feed speed up to the desired level. The user sets the function ON/OFF and sets the initial value for the Upslope power / wire feed speed.
To adjust Upslope, with Control Pad, go to Settings > Start and stop logic > Upslope. When you select ON, the options for adjusting Time and Level appear on the screen.
Hot start

When you use the Hot start function, welding starts with parameter values that are different from the values used for the rest of the welding job. The Hot start function values are automatically set to the normal welding values after a predefined period of time. The functionality can be used, for example, when welding thick materials, where using extra power (heat) at the start helps ensure the high quality of the weld.
When the 2T trigger logic is in use, Hot start lasts for the predefined period of time.
Figure: 2T Hot Start
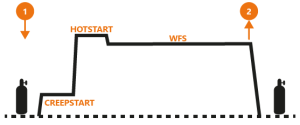
| 1. | Trigger is pressed. |
| 2. | Trigger is released. |
When the 4T or WP Switch trigger logic is in use, the Hot start starts when the trigger is pressed, and lasts until the trigger is released.
Figure: 4T/WP Switch Hot start
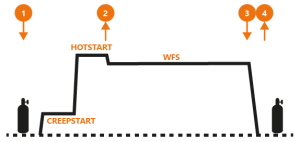
| 1. | Trigger is pressed. |
| 2. | Trigger is released. |
| 3. | Trigger is pressed. |
| 4. | Trigger is released. |
To adjust Hot start, with Control Pad, go to Settings > Start and stop logic > Hot start. When you select ON, the options for adjusting Time and Level appear on the screen. The default setting for Hot start is OFF.
Crater fill
When welding with high power, a crater is usually formed at the end of the weld. The Crater fill function gradually decreases the welding power/ wire feed speed at the end of the welding job so that the crater can be filled using a lower power level.
When the 2T trigger logic is in use, releasing the trigger launches the Crater fill sequence.
Figure: 2T Crater fill
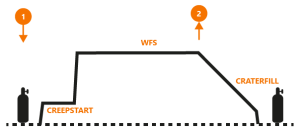
| 1. | Trigger is pressed. |
| 2. | Trigger is released. |
When the 4T or WP Switch is in use, pressing the trigger during the welding (in the case of WP Switch, pressing > 0.5 s) launches the Crater fill sequence. The system stays on the Crater fill finishing level until the trigger is released. Releasing the trigger immediately finishes the Crater fill sequence.
Figure: 4T/WP Switch Crater Fill
| 1. | Trigger is pressed. |
| 2. | Trigger is released. |
| 3. | Trigger is pressed. |
| 4. | Trigger is released. |
To adjust the Creater Fill parameters, with Control Pad, go to Settings > Start and stop logic > Crater fill. When you select ON, the options for adjusting Time, Start Level and End level appear on the screen.
| • | Time: For 2T, this defines the period of time that the Crater Fill sequence takes. For 4T/WP Switch, this defines the period of time it takes to move from the start level to the finishing level. |
| • | Start level: the level where the Crater Fill is launched. |
| • | Stop level: the level on which the Crater Fill is finished. |
When the 4T Timer is in use, pressing the trigger (in the case of WP Switch, > 0.5 s) launches the Crater Fill sequence, and the sequence lasts at least for the period of time defined for the 4T Timer, even if the trigger is released before that time has passed.
Pregas
The Pregas function ensures that the work piece is protected by shielding gas at the moment of the arc ignition so that the molten metal does not come into contact with air. This is essential with materials that require a good gas shield, like stainless steels, aluminium and titanium.
When the 2T trigger logic is in use, the Pregas lasts for the defined period of time. When the 4T or WP Switch trigger logic is in use, the Pregas lasts until the trigger is released.
To adjust the pregas time, in Control Pad, go to Settings > Start and stop logic > Pregas time.
Postgas
The Postgas functions ensures that the work piece is protected by gas after the arc is switched off so that the molten metal does not come into contact with air. The workpiece is protected by shielding gas until it has sufficiently cooled down. This is especially useful with materials that require excellent gas shield, like stainless steels and titanium.
When the 2T trigger logic is in use, the Postgas lasts for the predefined period of time. When the 4T or WP Switch trigger logic is in use, the Postgas lasts until the trigger is released; however, at least for the predefined period of time.
To adjust the Postgas function, go to Settings > Start and stop > Postgas. Select Set time > Postgas time to define the period of time that the Postgas lasts, or Set to default to select the pre-set time.
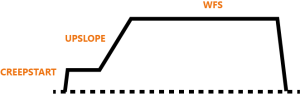
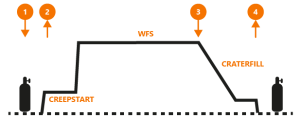
Creep start

The Creep start function defines the wire feed speed before the welding arc ignites, that is, before the filler wire comes in contact with the workpiece. When the arc ignites, the wire feed speed is automatically switched to the normal user-set speed. The Creep start function is always on.
To adjust the Creep start level, in Control Pad, go to Settings > Start and stop logic > Creep start level. The adjustment range is 10%...90%.
Figure: Creep start

WF end step
Immediately after the arc is switched off, the wire feeder feeds a few extra millimeters of filler wire, so that the wire does not stick into the contact tip.
To set the WF end step ON or OFF, in Control Pad, go to Settings > Start and stop logic > WF end step.