Hot start and crater fill functions
With X5 Manual wire feeder models you can use the Crater fill function and adjust its parameters by pressing the Settings menu button in the control panel (Using X5 Manual control panel).
With X5 AP/APC wire feeder models you can use the Hot start and Crater fill functions and adjust their parameters in the Welding parameters view (AP/APC control panel: Welding parameters).
For the trigger logic functions in general, refer to Trigger logic functions.
Hot start
When you use the Hot start function, welding starts with parameter values that are different from the values used for the rest of the welding job. The functionality can be used, for example, when welding thick materials, where using extra power (heat) at the start helps ensure the high quality of the weld.
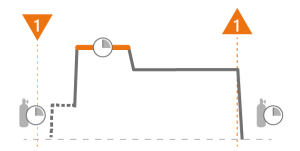
When the 2T trigger logic is in use, Hot start lasts for the predefined period of time.
Hot start with 2T:
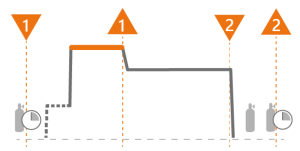
When the 4T trigger logic is in use, Hot start starts when the trigger is pressed and welding starts, and lasts until the trigger is released.
Hot start with 4T:
Additional notes:
| • | Hot start slope time adjustment sets the transition time from the Hot start phase to the normal welding current level. |
| • | Hot start level and time are adjustable in 2T trigger logic only. |
| • | Hot start fine tuning (voltage) is adjustable with 1-MIG, Pulse, DPulse, WiseThin+ and MAX Speed processes. |
Crater fill
When welding with high power, a crater is usually formed at the end of the weld. The Crater fill function gradually decreases the welding power / wire feed speed at the end of the welding job so that the crater can be filled using a lower power level.
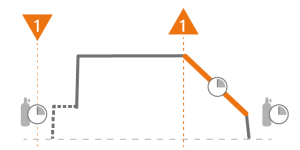
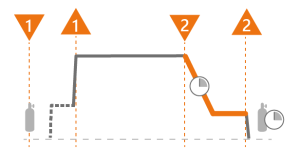
When the 2T trigger logic is in use, releasing the trigger launches the Crater fill sequence. Crater fill lasts for the predefined period of time.
Crater fill with automatic/synergic MIG processes and 2T:
Crater fill with manual MIG process and 2T:
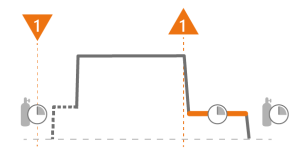
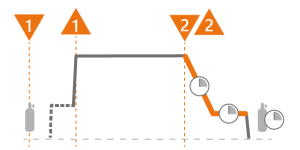
When the 4T trigger logic is in use, pressing the trigger during the welding launches the Crater fill sequence. The system stays on the Crater fill finishing level until the trigger is released. Releasing the trigger immediately finishes the Crater fill sequence.
Crater fill with 4T:
Additional notes:
| • | Crater fill fine tuning (voltage) is adjustable with 1-MIG, Pulse, DPulse, WiseThin+ and MaxSpeed processes. |
| • | In manual MIG process, the Crater fill time, wire feed speed and voltage can be adjusted, but the Crater fill level settings are not available. |
| • | In automatic/synergic MIG processes, the Crater fill fine tuning, time and level settings can be adjusted, but the Crater fill wire feed speed and voltage settings are not available. |
Crater fill with timer
Crater fill's timer option is available with 4T trigger logic and in automatic/synergic MIG processes only. It allows setting a fixed duration for the Crater fill end level. When the Crater fill function with timer is selected and the Crater fill end level time is set, the Crater fill sequence will stop after the preset duration even if the trigger is kept pressed.
In the timer mode, the Crater fill end level time parameter affects the duration of the end level and the Crater fill time parameter affects the slope time (the duration of the transition from the welding level or Crater fill start level to the end level).
If the trigger is released and then pressed again during the Crater fill sequence, the Crater fill is stopped.
Additional notes:
| • | In automatic/synergic MIG processes, the Crater fill fine tuning, time and level settings can be adjusted, but the Crater fill wire feed speed and voltage settings are not available. |
| • | Crater fill fine tuning (voltage) is adjustable with 1-MIG, Pulse, DPulse, WiseThin+ and MaxSpeed processes. |
Symbols:

|
Function |

|
Trigger press (down) |

|
Creep start |

|
Trigger release (up) |

|
Set duration |

|
Pre gas / post gas |