Connecting cables to R500 WF EUR/EUR+
This section describes how to connect cables to the R500 Wire Feeder EUR/EUR+.
For the wire feeder connector descriptions and their locations, refer to R500 Wire Feeder EUR/EUR+.

|
Model-specific variations occur in the connectors. |
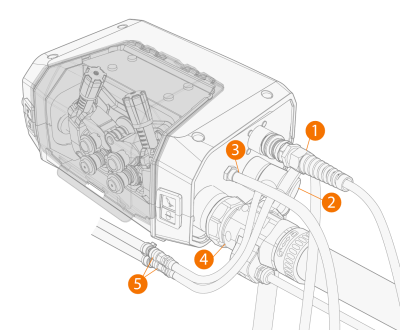
Front
R500 Wire Feeder EUR+
R500 Wire Feeder RH EUR+
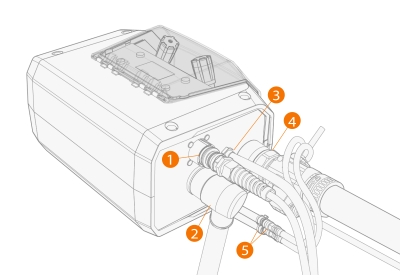
| 1. | Connect the control cable for welding torch auxiliary devices (1) to the peripheral connector. |
| 2. | Connect the welding current cable (2) to the positive (+) connector and tighten it with an appropriate tool. |
| 3. | R500 Wire Feeder EUR+: To use welding torch cleaning with compressed air, connect the compressed air hose (3) to the outlet connector. |
| 4. | Push the welding torch connector (4) to the Euro connector and hand-tighten the collar. |
| 5. | If you have the optional cooling unit, connect the cooling liquid hoses (5). |
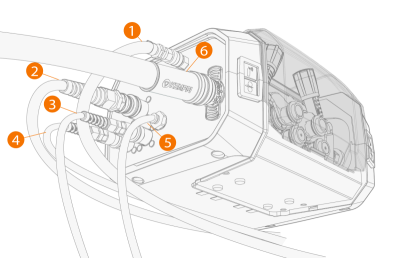
Rear
R500 Wire Feeder EUR+
R500 Wire Feeder RH EUR+
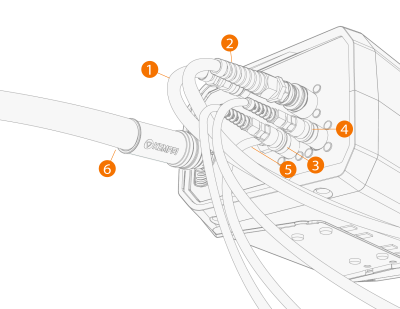
| 1. | Push the shielding gas hose (1) to the connector so that it locks down. |
| 2. | Connect the wire feeder control cable (2) to the connector. |
| 3. | R500 Wire Feeder EUR+: To use the WiseThin+ or WiseRoot+ process, connect the voltage sensing cable from the workpiece (3) to the connector. |
| 4. | R500 Wire Feeder EUR+: To use the WiseThin+ or WiseRoot+ process, connect the voltage sensing cable from the power source (X5 Pulse+ power sources only) to the connector (4). |
| 5. | R500 Wire Feeder EUR+: To use welding torch cleaning with compressed air, connect the compressed air hose (5) to the inlet connector. |
| 6. | Connect the wire conduit (6) to the connector. |
>> Always use the insulating sleeve (delivered with the wire feeder) in the wire conduit connector.