Viewing and editing verification reports
Verification report list
The verification files list contains the verification files that have been transferred from the RC device via DataStick. Once they have been opened, the data will be used to fill a verification report. After you have finalized the report, you can export or print it as a complete certificate.
Click the search field on the right side of the window to search for verification files based on the name of the company or the name of the equipment.
If you want to edit, export, print or delete a single verification file, select the checkbox on the left side of the file. If you want to handle several files at the same time, select all the appropriate files.
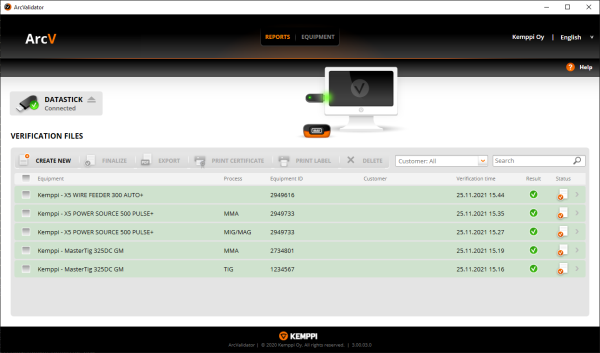
The newly added verification files are emphasized with a green background color.
Searching for verification files
The search function helps you to find a particular verification file or files. The information is sought from all the validated files in the system, including the ones just transferred.
To search for a report or reports:
Click the Search field on the right side of the window to search for verification files based on the name of the company or the name of the equipment.
The files that meet the search criteria will be shown on the top of the verification files list.
Creating and finalizing verification reports
The newly transferred verification files and reports will be opened with all the verification data already in place.
To finalize a report:
| 1. | On the verification files list, select the file or files you want to finalize and click the Finalize button. |
| 2. | In the Finalize report window, fill in the required information (at least the names of the customer, validating inspector and verification company). |

|
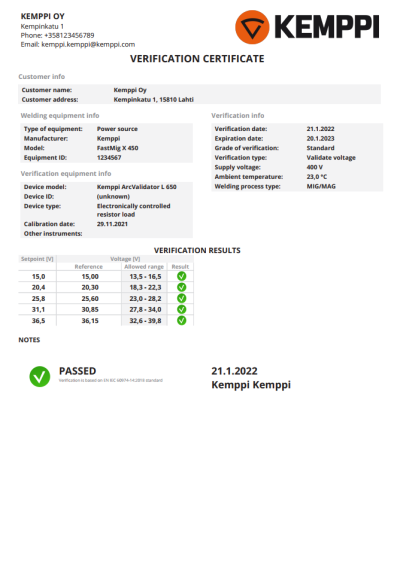
The verification expiration date is one year from verification by default. If, for example, precision verification is used, the expiration time can be changed to e.g. 6 months. |
| 3. | When you have filled in all the necessary information, the Export button becomes enabled and you can export the report into a PDF format certificate. You can also print the report/certificate or just close the report form. |
Creating a new empty report form
The information can also be entered manually. This makes it possible to have all your verification reports in one place on the computer, even if they have been originally created using other methods.
To create a new report from scratch:
| 1. | On the verification files list, click the Create report button. |
| 2. | In the welding equipment selection window, select the equipment manufacturer, model and welding method. |
| 3. | In the new report creation window, fill in the required information (at least the name of the customer, verifying inspector and verification company). |
>> Maximum and minimum values are preset in the form. Fill in the measured values, and the ArcValidator PC application will tell you whether the equipment passed the verification or not.
| 4. | When you have filled in all the necessary information, the Export button becomes enabled and you can export the report into a PDF format certificate. You can also print the report/certificate or just close the report form. If you leave the report incomplete, click the Finalize button to complete the report when you open it later. |
Exporting certificates
After your verification reports are finalized and complete, you can export them as certificates in PDF format.
To create PDF format certificates:
| 1. | On the verification files list, select the finalized report or reports you want to export and click the Export button. |
| 2. | Browse for a suitable folder for certificate files and click OK. |
| 3. | Click Save to create the PDF certificate file. |
| 4. | The exported certificate is saved in the specified folder as a PDF file. |